Lesson Four: Force and Motion – Explorations with Pinwheels
Grade Level: 3rd Grade
Time: 60 minutes (Additional time will be needed if students are constructing pinwheels.)
Essential Question: How can we be stewards of Wyoming’s mineral and energy resources to benefit current and future generations?
Objectives: Students will explore balanced and unbalanced forces and their effect on the motion of an object by looking at the effects of varying “wind” forces on a pinwheel.
Purpose: Students learn how wind speeds and direction in Wyoming affect a turbine.
Required Materials/Resources:
-
- Animation of how a wind turbine works (Source 1) https://energy.gov/eere/wind/animation-how-wind-turbine-works
- Store bought pinwheels (recommended) – (one per pair of students at the minimum) OR
- Materials for pinwheels
-
- Pinwheel Pattern template on cardstock (one per student) (Source 2)
- Scissors
- Pins or thumbtacks
- Unsharpened pencils
-
- Fan (at least one; if possible, more than one – see step 4)
- Hair dryer (at least one; if possible, more than one – see step 4) You will want to make sure that the dryer has a “cool” or “medium” setting, particularly if you are using store bought pinwheels.
- Straws
- Forces and Motion with Pinwheels – Predictions and Observations sheet (one per student)
- Force and Motion cloze activity (one per student)
Standards:
Science: 3-PS2-1-(DCI), 3-5-ETS1-3(Explicit)
Suggested Teacher Preparation:
-
- Follow the link and practice with the animations on how a wind turbine works.
- If you did not purchase pinwheels, practice making the pinwheel to assist students.
- Test the pinwheel experiments to familiarize yourself with the results.
Vocabulary:
-
- Control – standard against which experimental observations may be evaluated
- Force – a push or pull on an object
- Motion – the act of changing location from one place to another
- Turbine – a machine for producing continuous power using a wheel or rotor that is caused to spin by pressure from water, steam, or air
- Variable – something purposely changed so that the effect can be tested
Instructional Procedure/Steps:
-
-
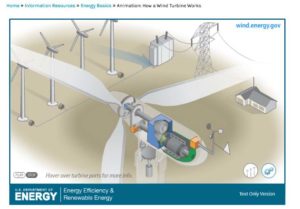
- Show the animation of how the turbine moves. https://energy.gov/eere/wind/animation-how-wind-turbine-works
-
-
-
-
- Use the first animation to explain the different parts of the turbine.
-
-
-
-

-
-
-
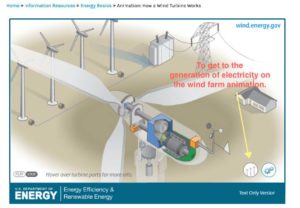
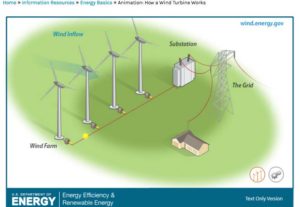
- Click on the animation in the right-hand corner to show how electricity is generated at a wind farm.
-
-


-
- Store bought pinwheels will work best for this experiment, but if you do not have access to them, students can build their own. Put students into partner groups and pass out the materials. Use the provided instructions to build the pinwheels.
- After students (or pairs) have a pinwheel, draw students’ attention back to the animation of a wind turbine. Ask: “What needs to happen in order for a wind turbine to produce electricity?” It needs to spin/turn. Say: “We are going to investigate the effects of wind on a pinwheel. Before we can begin, we need to have a starting point to compare with. Right now our pinwheels are not turning. They are at rest. The pinwheel at rest is called our control. It is our control because the pinwheels will stay the same during our tests. They need a force to act upon them in order to get them to move. What force makes a turbine or pinwheel rotate?” Wind. “In order for this to be a fair investigation, we need to think about our variables. Variables are things that can change. We only want to change one thing at a time. We are going to simulate some wind forces on our pinwheels in order to observe which wind force moves them the best.” Ask: “How might we create some ‘wind’ in the classroom?” Students may suggest a variety of methods including blowing on their pinwheels. Once the suggestion to blow on them has come up, say: “We’re going to try creating some ‘wind’ by blowing. Pick up your pinwheel and see if you can get it to rotate by blowing on it.” Allow students some time to do so. Say: “We were able to get our pinwheels to spin because of the force of the moving air that we were providing. What was the effect of the force that we applied?” Motion – the pinwheels spin. “Now, let’s do some additional explorations!”
Teacher Note:
Analysis
In this task, students will be engaged in the higher order thinking skill of analysis.Synthesis
In this task, students will be engaged in the higher order thinking skill of synthesis.Pass out the Predictions and Observations sheet. Read through the directions for each step once, and then allow students time to go through the explorations. All students should complete steps 1-4. Ideally, students should also have the opportunity to explore one of the additional challenges. As they are conducting their experiments, circulate to ensure that they are recording their predictions first, that they are keeping track of observations, and that their observations match what they are actually seeing.Application
In this task, students will be engaged in the higher order thinking skill of application.- After students have had adequate time to explore, have them put materials aside and come together for a class discussion. Go through each of the experiments on the sheet, asking a few students to share out their results for each one. After discussing their results, say: “Now, I would like you to turn and talk to a partner about what conclusions you can make about how the force of wind affects the motion of a pinwheel. You will have 60 seconds for both partners to share their thinking.” Give students time to share listening in for key ideas as they do so. Take note of which students have identified important concepts, so you can ask them to share out with the whole group. Generally speaking, students should come to the following conclusions:
-
-
- It takes a certain amount of wind to get the pinwheel spinning. (Students may be able to identify that the force of the wind has to overcome the forces of gravity and friction that are also acting on the pinwheel.)
- The faster the wind speed; the faster the pinwheel spins.
- The direction of the wind impacts the motion of the pinwheel.
-
-
- Say: “As we continue to process what we learned, I want us to see what happens when the wind is coming at a pinwheel from both sides.” Have two students come up, and have both of them blow on the pinwheel at the same time. One should be blowing to make it move clockwise, and the other blowing to make it move counterclockwise. See if you can get the two forces to balance, so that the pinwheel doesn’t actually move at all.Say: “When an object has equal (balanced) forces working on it, it will not move.”
-
- To help students apply these concepts to the production of wind energy, say: “Now, let’s think about how some of our observations and conclusions with the pinwheels might relate to wind turbines that are used to produce energy.” Discuss each of the conclusions below, allowing students to share their ideas about how it might relate to wind energy production and adding ideas as necessary.
-
-
-
- “It takes a certain amount of wind to get the pinwheel spinning.” (Students may be able to identify that the force of the wind has to overcome the forces of gravity and friction that are also acting on the pinwheel). This means that there needs to be enough wind to make the turbines move. Engineers need to find locations where there are sufficient wind speeds. It also means that when the wind isn’t blowing or isn’t blowing hard enough, the turbines won’t move, which means they won’t be producing energy.
- “The faster the wind speed, the faster the pinwheel spins.” Since the turbine spinning is what produces energy, faster turbines mean more energy. We want to put turbines in places where there are high wind speeds. Note: An important consideration is that there is a limit to this idea. Ask students what they would think would happen if they kept adding faster and faster wind to their pinwheels. Eventually, it would be too much for the pinwheel to handle. The same is true for turbines. If the wind is blowing too much, sometimes the turbine operators have to shut them down. There are also some places in Wyoming where turbines were installed, and engineers have since discovered that they are not ideal locations for wind energy production because it’s actually too windy there.
- “The direction of the wind impacts the motion of the pinwheel.” The turbines need to be facing the wind in order for it to spin them. Turbines all have computer controls that allow them to pivot, so that they are facing the wind.
-
-
-
- To help students apply these concepts to the production of wind energy, say: “Now, let’s think about how some of our observations and conclusions with the pinwheels might relate to wind turbines that are used to produce energy.” Discuss each of the conclusions below, allowing students to share their ideas about how it might relate to wind energy production and adding ideas as necessary.
Assessment:
When finished discussing the conclusions, collect the students’ Predictions and Observations sheets, and pass out the Force and Motion check for understanding. This cloze activity is intended to help you determine if students understand the science content of the lesson. Any concepts that students are struggling with can be revisited in future lessons.
Teacher Note:
Credits/Sources:
-
-
- U.S. Department of Energy. (n.d.). Animation: How a Wind Turbine Works. Retrieved June 28, 2017, from https://energy.gov/eere/wind/animation-how-wind-turbine-works
- Home Training Tools Ltd. (n.d.). Experiment with Wind Power: Pinwheel Wind Turbine. Retrieved June 28, 2017, from https://www.homesciencetools.com/a/wind-energy-science-newsletter/
-